Do you wish to learn how to build a membership site? For many years, websites relied only on ads and affiliate links to make money on their content. Today, you have more options. You find a few great WordPress membership plugins. They will be a big help when you create a membership site.
In this post, you learn how to build a membership site step by step. I hope you like and share this article.
Table of Contents
- How to build a successful membership site
- Some benefits of having a membership website
- Step 1: How to build a membership site from zero
- Step 2: MemberPress installation
- Step 3: How to build a membership site: Create memberships
- Step 4: Setup membership access
- Step 5: How to build a membership site: Add payment methods
- Step 6: Add a membership pricing page
- How to build a membership site: Summary
- FAQs
MemberPress is a good premium plugin for this topic, even though it has no free plans. It offers many powerful features when you aim to know how to build a membership site. Hence, we’ve decided to use MemberPress in our tutorial.
To ensure you don’t miss any details, stay until the end.
But first, we look at what you need before learning how to build a membership site. After that, you also get some benefits for having a membership website.
How to build a successful membership site
It’s not so hard to make a website anymore. With WordPress, anyone can learn how to build a membership site and begin to sell. It is possible even though you have limited or no tech know-how.
You need these 3 things to begin
- A domain name that is your site’s address, for instance, MemberPress.com,
- A web hosting account where website files get saved,
- and a membership plugin that turns your site into a membership site.
You can learn how to build a membership site with MemberPress in under an hour. We will guide you step by step.
Beneath, you get some benefits for having a WordPress membership website.
Some benefits of having a membership website
Most websites make money by showing ads. But how do you maximize the profit? You need to ensure your content is good enough. It will keep readers on your site longer. They see more ads and sometimes click on them, so you earn more money.
Is your profit due to you posting high-quality content? So why not try to monetize your content at once?
Which vital benefit can you gain by knowing how to build a membership site? Lock your best content behind a paywall. Readers must buy a membership to access your content. Hence, you are making money straight from your readers. Also, you don’t have to risk your site’s look with intrusive ads!
It’s not only the content you can make money on. You can also lock in extra site features. Say, for example, access to files for download, community, and further.
But what do you need to apply that strategy? You need to use both a capable and reliable platform. It is vital once you learn how to build a membership site.
The platform must do this:
- manage users,
- enable membership signups,
- limit unauthorized access,
- create members-only content,
- handle payments,
- and be compatible with your WordPress theme.
Happily, MemberPress has all these features and a lot more. Here is a quick look at the key features. It will give you a good overview. MemberPress is one of the best membership platforms for WordPress.
MemberPress key features
- Easy setup. Install the plugin, enter payment methods, and add products.
- Limit access to pages, posts, custom post types, categories, files, etc.
- Make coupons and offer your memberships at lower prices.
- Create dynamic pricing pages to show your membership products.
- Support for content dripping and timed content expiration.
- Feature-rich subscription management tool.
- Detailed reporting with actionable data.
- It supports PayPal and Stripe as payment gateways.
- You find tons of extensions and add-ons to add more features.
- Integration with popular WordPress Forum plugins.
- LMS (Learning Management System) platform. Build and sell courses.
- It also works with all WordPress themes.
Yet, what about MemberPress pricing? Does it offer different pricing plans, or how does it work?
After that, you learn how to build a membership site from zero. So, keep hanging on.
MemberPress pricing
MemberPress is a premium plugin with no free options.
If you want to start, you can pick the Basic plan, which costs $179.50/year for one site.
Do you need support for more websites and access to more advanced features? If so, you can go for their Plus and Pro plans. The Plus plan costs $299.50/year and Pro $399.50/year.
Now you know the different features the MemberPress plugin has. Let’s go over a step-by-step guide on how to build a membership site with MemberPress.
Get MemberPress, All-in-one Membership Plugin for WordPress:
Visit MemberPress
Tips
Back up your WordPress site Always do that before you begin
Step 1: How to build a membership site from zero
First, once you want to learn how to build a membership site, use the best WordPress platform. There are two types of WordPress: WordPress.com and WordPress.org.
Note: Use the WordPress.org version to self-host your site. Why? It gives you unlimited access to all the tools and functions you need.
How to install WordPress on Bluehost
Right below, you will install the WordPress.org software in 7 easy steps.
- Log in to your cPanel account on Bluehost.
- Go to the website section, and you will find the option to Install WordPress.
- You click on the button Install.
- Now, pick the domain name to install it to. In the field next to the domain, you can add a subfolder like blog or leave it empty. We leave this field empty.
- Do you need to edit your email address, username, and password? Click the Advanced options, and you can alter these settings.
- Read their license and service agreements and accept them by checking the boxes.
- Click the button Install Now.
What do you need to start a WordPress website that you self-host? A WordPress web hosting account, domain name, and an SSL certificate.
Did you start recently? Then, your startup costs may rise fast.
Thanks to Bluehost, you get a free domain name and a free SSL certificate. They also offer 24/7 support and a special discount on their web hosting. Bluehost is also an officially advised WordPress web hosting company.
Do you choose Bluehost as your web hosting? Your site will be fast even if it gets a lot of traffic. You get many helpful functions, such as unlimited SSD storage and server resources.
As a whole, Bluehost gives you a good user experience. So, it makes them one of the top choices once you think about web hosting.
Get Bluehost, Special Offer for WordPress Users, Over 50% OFF:
Visit Bluehost
NOTE: Here at WP Web Guide, we value honesty. If you pay for Bluehost web hosting via our referral link, we earn a small commission at no added cost. As a result, you get a free domain name for the first year and a free SSL certificate.
Bluehost delivers WordPress pre-installed. All you do is install and set up MemberPress to create a membership website.
It ends the first step in how to build a membership site. Below, you learn how to install the MemberPress plugin. Let’s move further and do it now.
Step 2: MemberPress installation
- 1. After buying MemberPress, log in to your MemberPress.com account. You download the zip file of this plugin from the Downloads tab.
- Get MemberPress, All-in-one Membership Plugin for WordPress:
Visit MemberPress - 2. Log in as an administrator to your WordPress site. Make sure you change “yourdomain.com” to your domain name. You access your WordPress login screen at, for example, mycars.com/wp-admin.
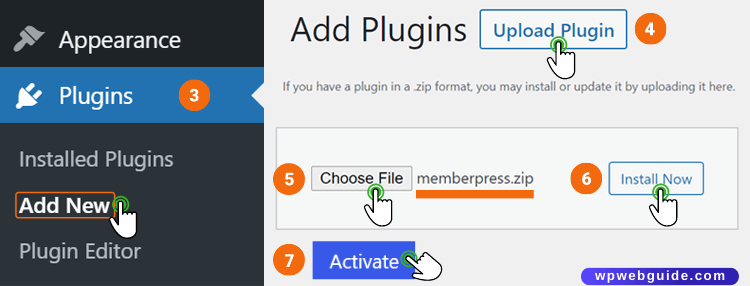
- 3. Go to Plugins » Add New.
- 4. You click on Upload Plugin.
- 5. Next – Choose File. Locate the MemberPress zip file you downloaded.
- 6. Click on Install Now.
- 7. Finally, you hit on Activate. And that’s all.

A new option named MemberPress will appear on the left side of your WordPress dashboard. Here, you can access all the features and options.
Now, it is time for the next step in how to build a membership site. In this section, you will learn how to create membership levels. Hence, let’s do it.
Step 3: How to build a membership site: Create memberships
To sell membership levels to users, you need to create them first. Each membership level should have various features and prices. Of course, you must grant subscribers access to the membership site.
OK, we are ready to create membership levels.
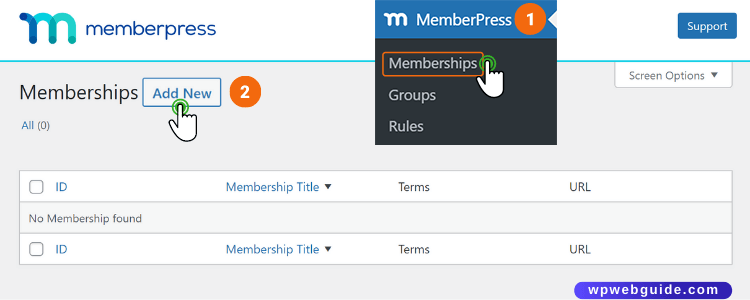
- 1. Move on to MemberPress » Memberships.
- 2. Click on the button Add New.

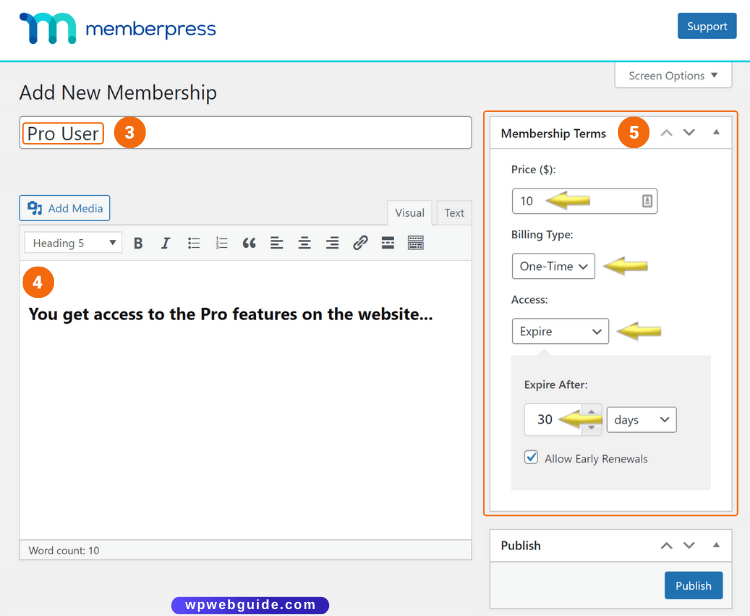
- On the right side, you can set Membership Terms. You can pick the billing type as One-Time or Recurring. Access choices: lifetime, expire, or fixed expire.
- 3. Enter the title of the Membership level.
- 4. Next, type the features and options for that plan.
- 5. In our example, access expires after 30 days. A pro user pays a one-time fee of $10. But you can pick the membership terms you want.

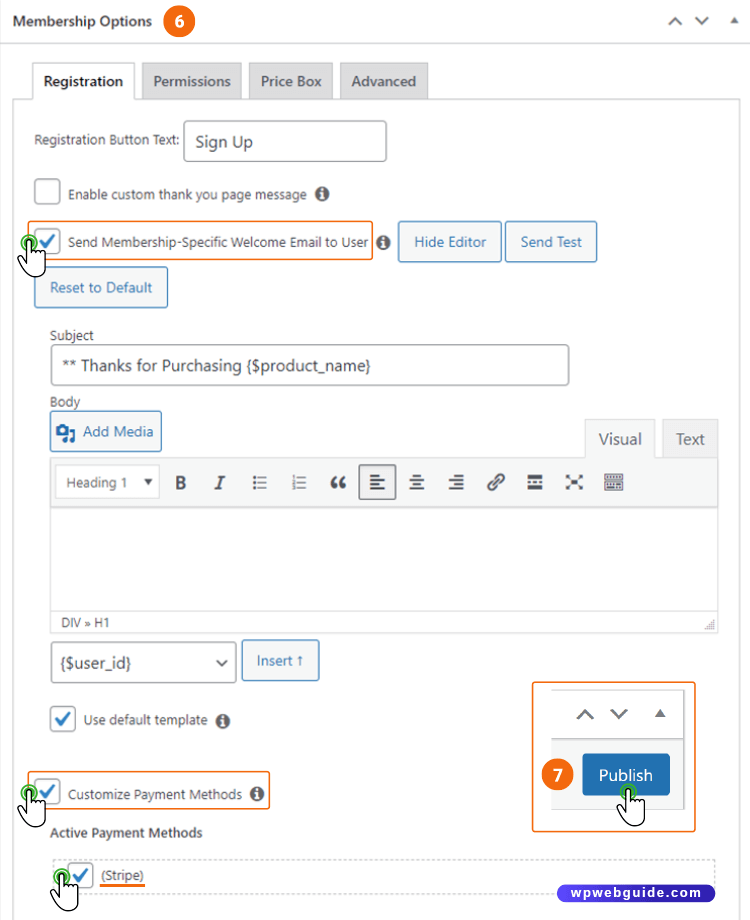
- 6. Scroll down and you see the meta box of Membership Options. Here, you customize permissions and options for this plan.
- 7. Finally, hit the button Publish. That creates your new Membership Level.

By using the above method, we create these Membership Levels:
- Advanced User
- Free User
- Pro User
- Ultimate User
To see all the Membership Levels you’ve created, go to MemberPress » Memberships.
You’ve finished Step 3 on how to build a membership site. Good work!
Step 4: Setup membership access
Your different membership levels are ready. Now, set up the Membership access at each level.
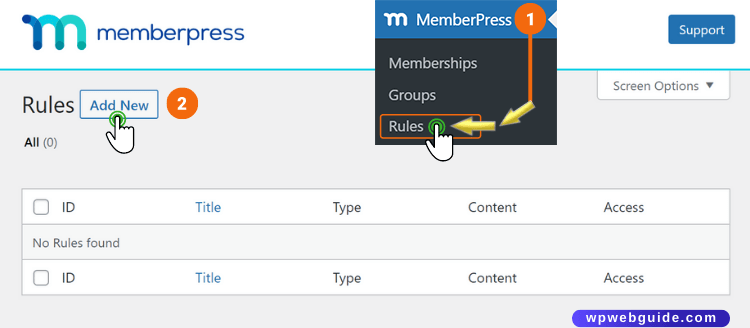
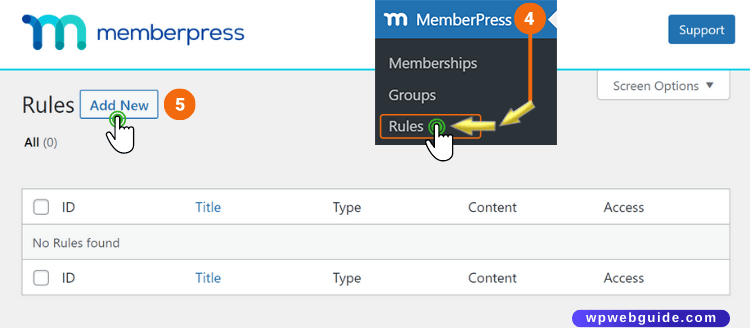
- 1. Go to MemberPress » Rules.
- 2. Next, hit the button Add New.

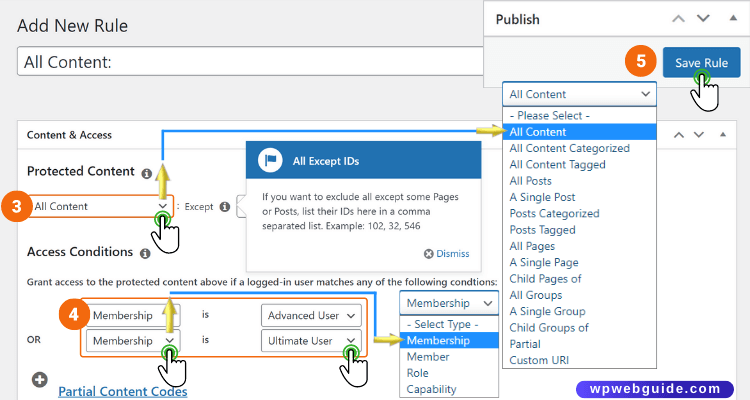
- Here, you can set up different conditions and associate them with a membership level. Say you want to create a new rule. A rule with All Content as protected. All Content rule: protected content is only available to Advanced and Ultimate users.
- 3. We pick the Rule – All Content under Protected Content.
- 4. Next, we give access to membership users, the Advanced User or Ultimate User. Under Access Conditions, select Membership and then select Advanced User. Click the “+” button, select Membership, and then Ultimate User.
- 5. Finally, you click on the button Save Rule. And that’s it!

Of course, you can also pick other options under Protected Content.
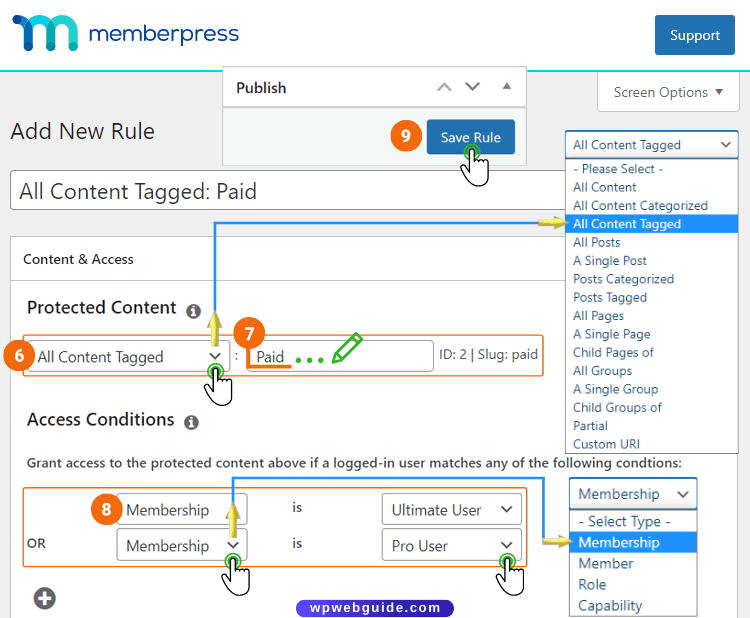
Open the Protected Content drop-down list, and you have these options:
- For All Content: Protects all posts and pages. You can exclude pages or posts.
- All Content Categorized: Protects all content types under a chosen category.
- All Content Tagged: All content types under a defined tag get protected.
- All Posts: All posts get protection. It’s possible to exclude a few posts.
- A Single Post: Protects a single user-entered post.
- Post Categorized: All posts in a specific category get protected.
- Posts Tagged: All posts in a defined tag get protected.
- All Pages: Protects all pages. Option to exclude a few pages.
- A Single Page: A single user-entered page will become protected.
- Child Pages of: All child pages of a user-entered page are protected.
- All Groups: Protects all groups. You can exclude a few groups.
- A Single Group: A single user-entered group gets protected.
- Child Group of: Protects all child groups of a user-entered group.
- Partial: Part of your content gets protected by shortcodes.
- Custom URI: Protect access to a custom URI on your site.
After you configured Protected Content, you set the Access Conditions.
You can grant access based on various things:
- Membership: Give access to the MemberPress membership level you’ve created.
- Member: Only grant access to a specific member.
- Role: Grant access to a WordPress Role, such as Admin, Editor, or Author.
- Capability: You can allow access to all users with a specific Capability.
You can also press the “+” button to add more Access Conditions.
Once you scroll down, you see there are a few extra options.
First, we have the Drip and Expiration meta box.
Enable Drip: You gradually deliver content instead of all at once.
Enable Expiration: You make your content unavailable after a set period.
Are you unsure? Leave them disabled.
Next, you will find the Unauthorized Access box.
- Show users an excerpt of the protected content.
- Inform users and show a message that the content is limited.
- Redirect to the login form so they can log in and get the content.
How to add members-only content
How you add members-only content depends on what rules you have created. Yet, with MemberPress, it’s simple to begin and make members-only content. You do that by creating Rules.
Let me give you an example. We want to create a new rule that limits access to the content by using the paid tag. Here’s how you do it:
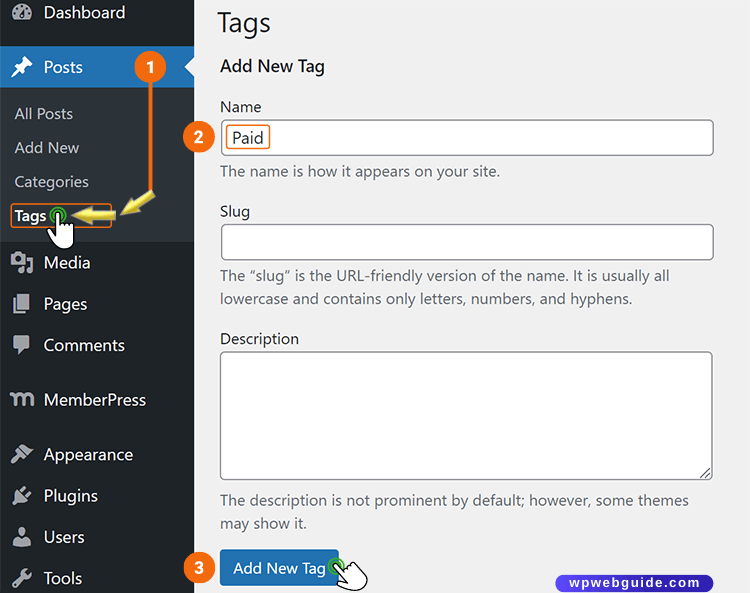
- 1. Go to Posts » Tags.
- 2. Enter Paid as the name. WordPress creates the slug field, so leave it empty.
- 3. Click the button Add New Tag. You’ve created a new tag.

- 4. Go to MemberPress » Rules.
- 5. Next, hit the button Add New.

- 6. We pick Rule – All Content Tagged under Protected Content.
- 7. Next, you type Paid into the field. The tag paid will show up.
- 8. We give access to the membership user, Ultimate User, or Pro User. Under Access Conditions, select Membership, and then select the Ultimate User. Next, click the “+” button, select Membership, and then Pro User.
- 9. Finally, you click on the button Save Rule. And you are done!

In the above example, we created a rule to limit access to content using the paid tag. But how do you set a post or page to only be available for members? Go ahead and add the paid tag.
Is the rule based on category? You add desired categories to the content to make it reachable to only members.
That’s all for step 4 on how to build a membership site. Next, you learn how to add a payment gateway.
Step 5: How to build a membership site: Add payment methods
OK, you have created your various membership levels and defined membership access. It’s time to set up the pricing page. But first, we need to add a payment gateway.
It’s a good idea to add at least one gateway for payments.
- Here’s how you do it:
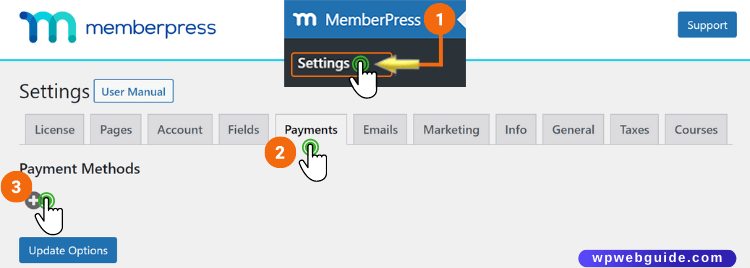
- 1. Go to MemberPress » Settings.
- 2. You click on the tab Payments.
- 3. Under Payment Methods, click on the “+” icon.

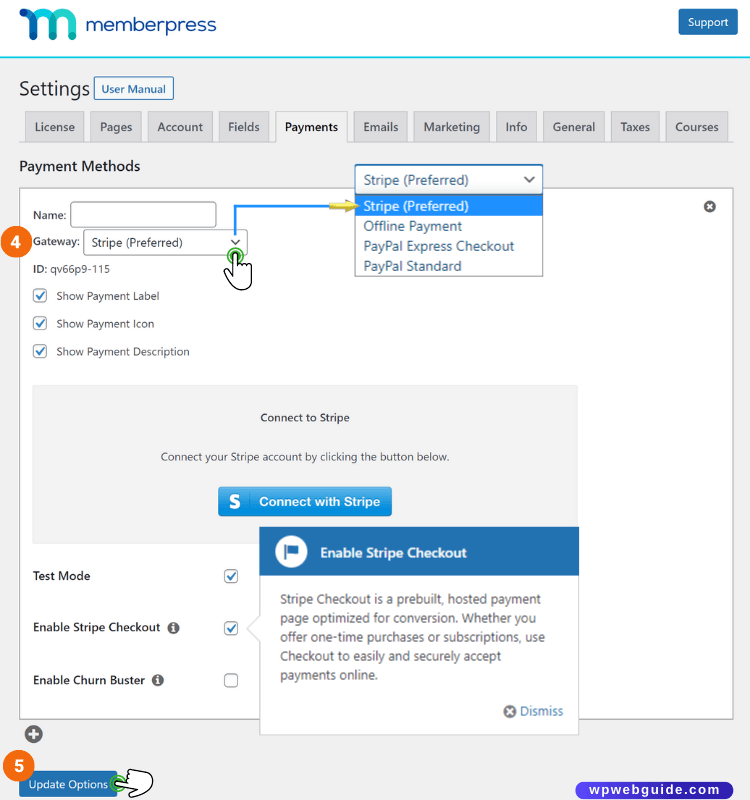
- By default, the selected payment gateway is Stripe. You can change it to Offline Payment, PayPal Express Checkout, or PayPal Standard. The choice is yours.
- 4. Select the payment gateway and then connect it to your account. You can add more payment options by hitting the “+” icon at the bottom.
- 5. Finally, once you’ve finished all settings, hit Update Options.

Great! Step 5 on how to build a membership site is complete.
Beneath, you will learn to add a membership pricing page.
Step 6: Add a membership pricing page
It’s time to create a pricing page where users can sign up for a membership plan. You can also configure this page as the redirect URL in case of unauthorized access.
- Below, we are ready to begin with and create your membership pricing page.
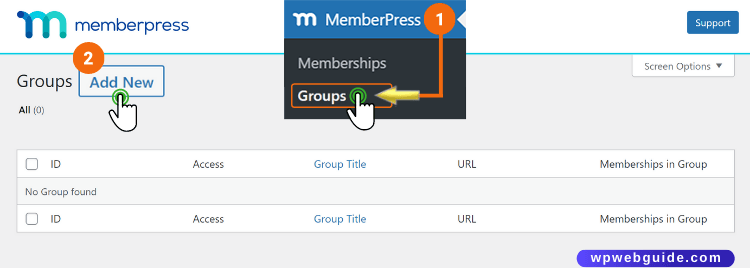
- 1. Go to MemberPress » Groups.
- 2. Click the button Add New.

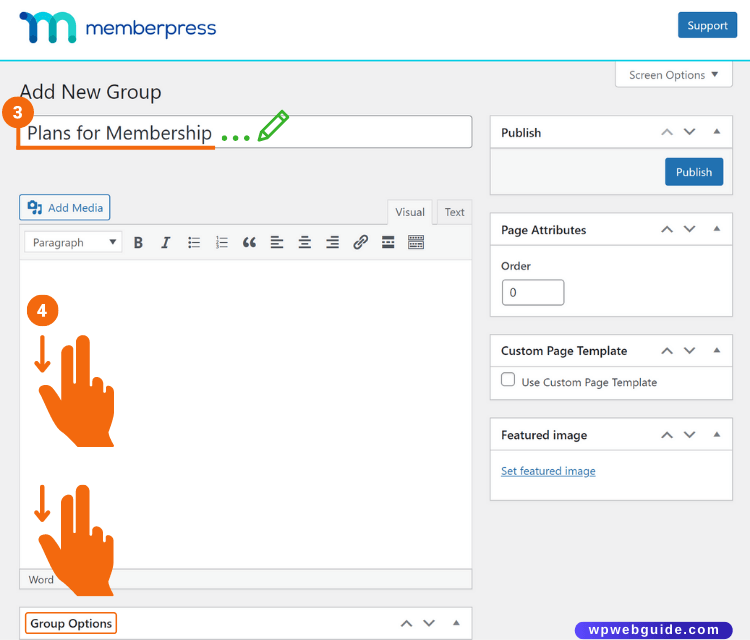
- 3. Enter the Group title. It will also be the title for the Pricing Page. You don’t need to add text to the content area.
- 4. Scroll down to Group Options.

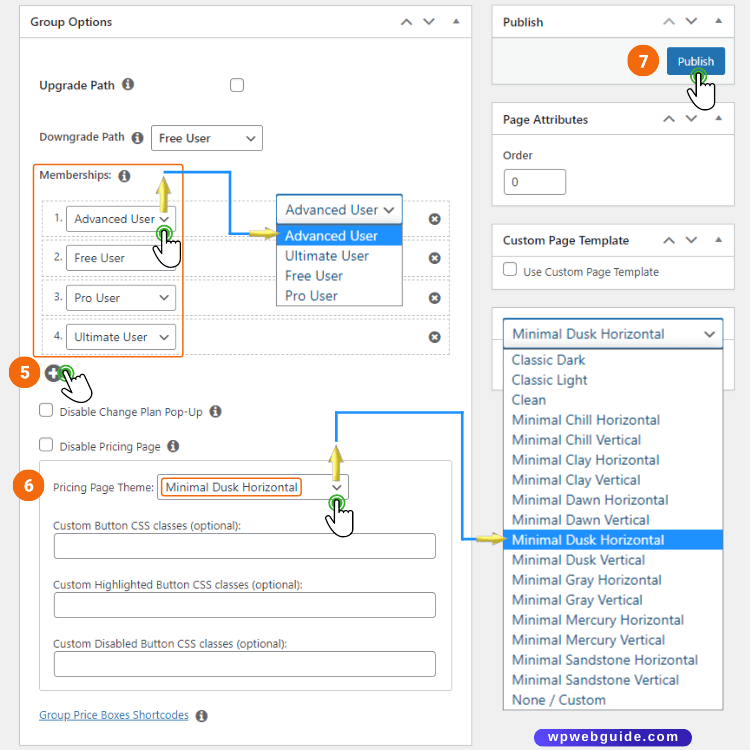
- 5. Click the “+” button under the section Memberships. With this action, you add the membership levels you want to show on the pricing page.
- 6. Select a Pricing Page Theme. We picked the theme Minimal Dusk Horizontal.
- 7. Once done, then you click the button Publish. The pricing page becomes public.

Do you want to look at your pricing page? If so, click the link View Group after you make it public.
Do you also want the Pricing Page to be easily reachable for your readers? Make sure to add the page to your site’s static elements, such as the menu, footer area, or sidebar.
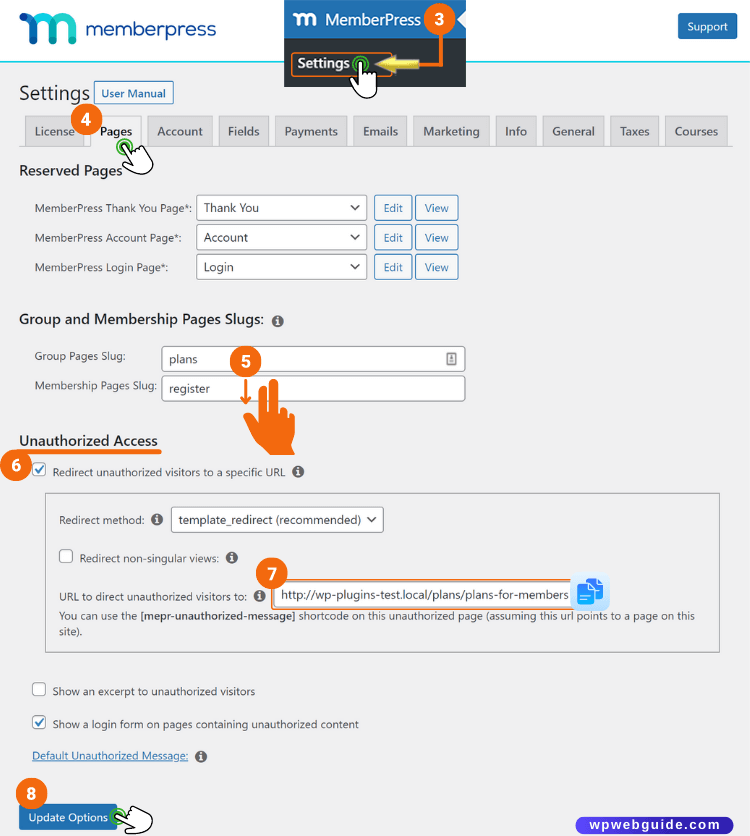
How to redirect users to your pricing page
Your pricing page is both live and posted. Great! Next, you learn how to redirect unauthorized users to your pricing page.
- So, let’s start and do it:
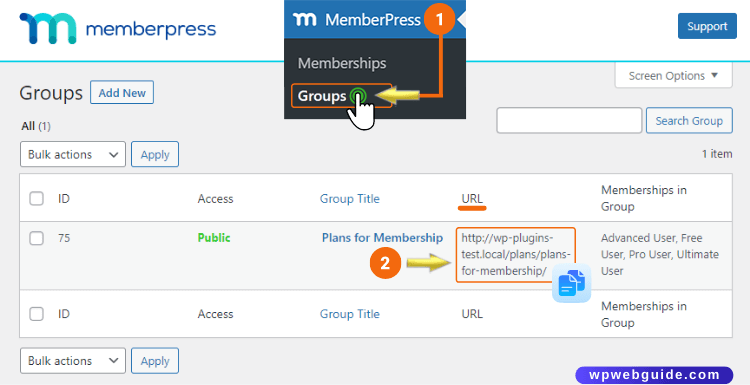
- 1. Go to MemberPress » Groups.
- 2. Copy the URL value next to the Group you’ve created recently.

- 3. After this, you go to MemberPress » Settings.
- 4. Then click on the tab Pages.
- 5. Scroll down to the section Unauthorized Access.
- 6. Enable the box next to Redirect unauthorized visitors to a specific URL.
- 7. Next, you paste the group URL you did copy sooner.
- 8. Finally, then hit Update Options. And it saves your changes.

Now, unauthorized users become redirected to the pricing plans page. It takes place once they try to reach a members-only zone.
That is the last step in how to build a membership site. Amazing!
» Watch the video: How to Build a Membership Site with MemberPress
OK, get ready for a quick summary of how to build a membership site.
How to build a membership site: Summary

Do you want to know how to build a membership site without hassle? MemberPress is a good plugin choice for that task.
At first, it may sound scary how to build a membership site. Yet, the process is quite simple once you decide to work with this plugin. The tool lets you easily set up, manage, and make money on exclusive content. It also regards even though you miss prior tech know-how.
What is one of the most useful functions of this plugin? Its ability to restrict access to content based on membership levels. Protect pages, posts, and even specific sections of your site. It ensures that only authorized members can enjoy premium content.
How to build a membership site and monetize it with MemberPress is easy. Why? Due to its seamless integration with various payment gateways. Accept safe payments and offer your members a hassle-free signup experience.
Track the performance of your membership site through built-in analytics tools. Gain insights into user behavior, subscription trends, and revenue generation. It helps you to make informed decisions to grow your site.
In short, using MemberPress and learning how to build a membership site is a breeze.
All you need to do is follow the 6-steps below
That’s it for this guide on how to build a membership site. Your membership website will be up and running in no time. Good luck 🙂
Are you looking for more tips and tutorials? Add an entry in the comments below. To assist you, we would love to create more practical how-to articles.
Did you like this article?
How to Build a Membership Site for Profit in 2025
Feel free to leave your comments so we can all read and learn from them.
Let us know your thoughts below.
Tips
You can also read 12 Common WordPress Mistakes Beginners Trap
FAQs
How do you structure a membership site?
To structure a membership site means creating evident membership levels. Each level gives members various benefits. Use a good plugin like MemberPress to turn your WordPress site into a membership site.
Organize your content into sections so members can find what they need based on their level. Make your site easy to use with simple menus and safe ways to manage members.
Are membership sites profitable?
Membership sites are a smart way to make recurring income. How much you earn depends on what you spend on your site, how you promote it, and the content you create. With a good plan, some membership sites can earn a 6-figure income.
What is a membership scheme?
A membership scheme enables you to build a long-lasting relationship with your clients. Members usually pay a regular monthly or yearly fee. They get certain benefits. Say unlimited or discounted entry, early ticket access, exclusive events, and other bonuses.
How do I create a subscription website?
Use a stable plugin such as MemberPress. It converts your existing WordPress site into a subscription website. MemberPress works as a subscription plugin since it offers recurring and one-time payments. You can set monthly, annual, and lifetime subscriptions for your clients. Learn how to install MemberPress

Share Your Comments & Feedback