Do you want to add users to your Brevo email list through your WordPress forms? If so, you can use the Brevo addon from WPForms. With it, you may subscribe, unsubscribe, and remove users from your Brevo account. All this is possible once your visitors submit your form.
In this post, I will explain how to connect Brevo to WPForms in five handy and easy steps. I hope you like and share this article.
Table of Contents
Are you ready to connect Brevo to WPForms in WordPress? But first, you learn more about Brevo, and after that WPForms.
What is Brevo?

Brevo (earlier Sendinblue) is a company that started in 2012. The founder and CEO is Armand Thiberge. You will find the headquarters in Paris. They have eight worldwide offices. Other than Paris, Delhi, Seattle, Berlin, Sofia, Toronto, New York, and Vienna.
Over 500,000 clients use Brevo products in the world today. They offer you a cloud-based software package for marketing. Their services include email marketing, marketing automation, Facebook ads, and SMS marketing. With Brevo software, you can perform A/B testing, produce reports, manage contact lists, etc.
Note: The former name of Brevo was Sendinblue. This company altered the name to Brevo in 2023. Yet, the branding changes will not affect WP Forms or Brevo functions at all. They work as before.
What is WPForms?

WPForms launched in 2016. Syed Balkhi and Jared Atchison are the founders of this WordPress plugin.
WPForms has many followers and users. At present, more than 4 million WordPress sites actively employ it. Over 8,000 people give it five stars on the WordPress.org plugin directory. This plugin has over 60 million downloads.
WPForms may be the most newbie-friendly contact form plugin of WordPress today. Their drag-and-drop form builder lets you make forms. Quickly and easily. You can create contact forms, email subscription forms, payment forms, etc.
Note: The instructions below only regard once you plan to make a brand-new install of WPForms. Do you upgrade from WPForms Lite? If so, you read the following tutorial: How to upgrade from WPForms Lite to a paid license.
Once you buy a WPForms Plus Pack or above, the Brevo addon is available. Hit the button to get WPForms and the Brevo addon at 50% Off:
*Do you wish to follow our tutorial to the end? Buy WPForms Plus Pack or above. Also, create a free Brevo account. It’s easy. Go on and read to see how you do that.
1. How to download the WPForms plugin
- Log into your WPForms account. No account? Buy WPForms Plus 50% Off.
- You click the Downloads tab.
- There you click the button Download WPForms.
- It saves the paid WPForms-plugin in a zip file on your device.
Note: Sometimes, the file might unzip once you download it and show as a plain folder. Still, the folder must be a zip file as you use the WordPress plugin upload area.
How to zip (compress) a file or folder on Windows
- Find the file or folder you wish to zip.
- Right-click (or press and hold) the file or folder. In the menu, select Send to, and now choose the compressed (zipped) folder.
A new zipped folder will appear in the same spot. It will have the same name as the original file or folder. To rename it, right-click (or press and hold) the zipped folder, pick Rename, and enter the new name.
How to zip a file or folder on Mac
- Open Finder or go to your desktop.
- Right-click (or Control-click) on the file or folder you want to compress.
- Select Compress from the menu.
Do you only compress one item? The new file will have the same name with .zip added at the end. If you zip (compress) many items together, the file will get the name Archive.zip.
Have you downloaded the WPForms plugin? Great!
There are further steps to take before you learn how to connect Brevo to WPForms. So hang in.
Tips
Back up your WordPress site Always do that before you begin
2. How to install the WPForms plugin
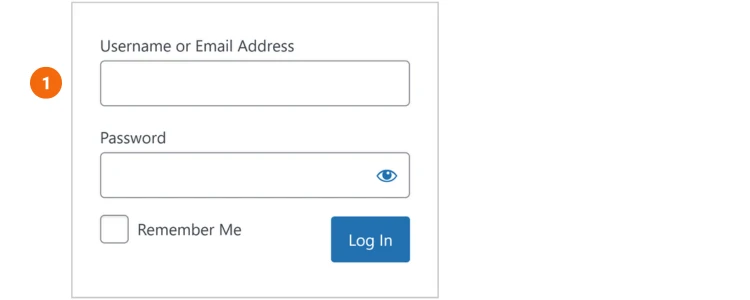
- Log in as an administrator to your WordPress site. Make sure you change “yourdomain.com” to your actual domain name. You can access your WordPress login screen at, for example, mycars.com/wp-admin.

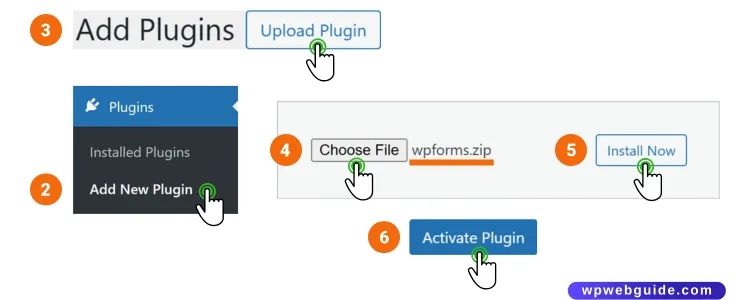
- Go to Plugins » Add New Plugin.
- Now you click on the button Upload Plugin.
- Click on Choose File and pick the zip file you downloaded from WPForms.
- You click the button Install Now.
- Lastly, click on the button named Activate Plugin.
It’s time to verify your WPForms license key. That gives you automatic updates and help with the plugin.
Do you plan to add your license key? Your WordPress dashboard gives you direct access to install and activate WPForms addons.
Note: When you buy at least a WPForms Plus pack, you also get the Brevo-addon. Hit the button to get WPForms and the Brevo addon at 50% Off:
*Do you wish to follow our tutorial to the end? Buy WPForms Plus Pack or above. Also, create a free Brevo account. It’s easy.
What is the cost of creating a Brevo account?
You can create a free account here. If you have an account, log in with your user details.
Their free plan lets you send 300 emails a day. You may send 9,000 emails a month if you want. And that’s a lot for free.
The cost of Brevo is good enough compared to further competitors. For instance, the free Mailchimp plan only lets you add 500 contacts.
The free Brevo plan can save up to 100,000 contacts in your account. 2,000 unique contacts you can add to your active marketing automation. You can’t add more contacts above this limit unless you upgrade to Business or Enterprise.
Brevo also offers paid plans. They are Starter, Business, and Enterprise.
3. Connect Brevo to WPForms: Create your account
But what is required by you to follow our tutorial? It’s enough to create a free Brevo account.
Beneath, you learn to connect Brevo to WPForms in WordPress.
4. How to install the Brevo addon
Brevo lets you subscribe, unsubscribe, and remove users from email lists. You can also track events.
Have you finished installing and activating WPForms? Great! Now it’s time to install the addon for Brevo. Just follow along.
- 1. Start by going to WPForms » Settings.
- 2. There, you click the tab Integrations.
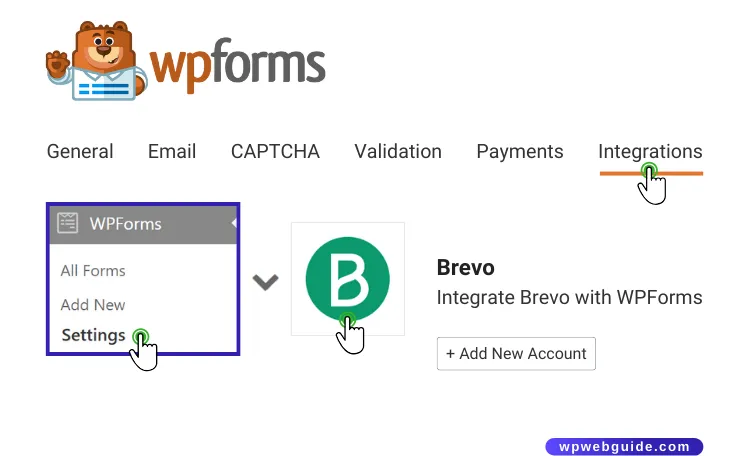

- 3. Click the option for Brevo to show its settings.
- 4. Hit the button +Add New Account.


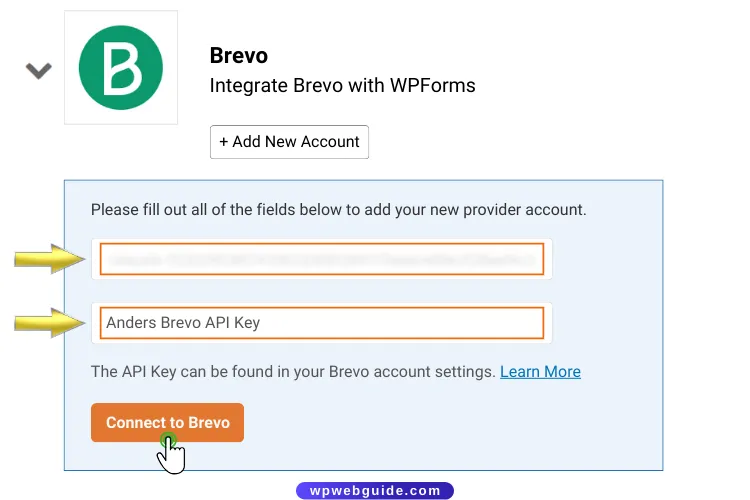
- 5. You see two fields: API Key for your Brevo account and Nickname.


- 6. Log in to your Brevo account. There, you will create the API Key.
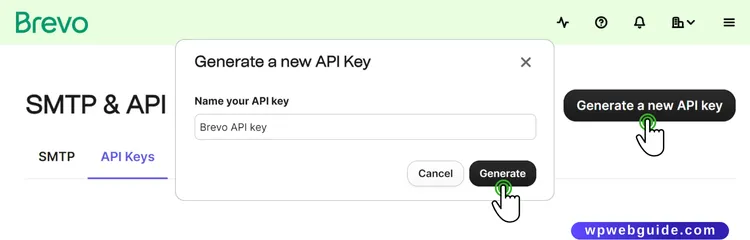
- 7. You click the primary menu in the upper right corner. Choose SMTP & API.


- 8. Click on the tab API Keys and then push the button Generate a new API key. Enter a name for your API key and hit the button Generate.
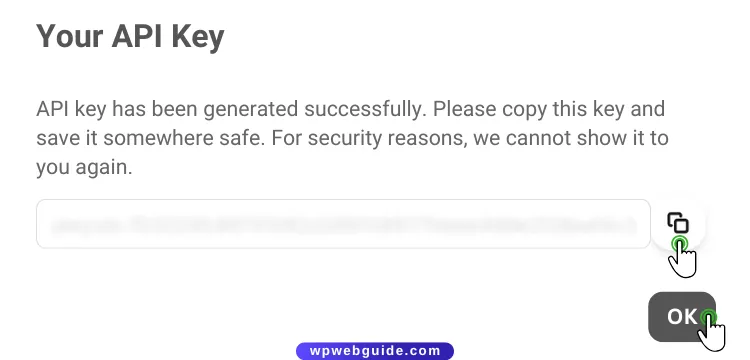
- 9. Copy the API Key by clicking on the Copy icon. Hit the button OK.
- 10. Go to WPForms » Settings. Paste the API-Key in the field Brevo API Key. Enter your nickname into the field Brevo Account Nickname. Finally, hit Connect to Brevo.

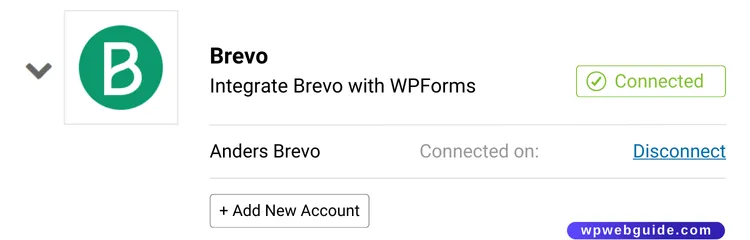
WPForms connects your site to the Brevo account. After that, it shows a green marked Connected status beside the Brevo integration.
5. Create an integration of Sendinblue to your site forms
Now, you have connected your account to Brevo. Good work!
It’s time to append Brevo to one of your forms. But first, you must create a brand new form with relevant fields. To do that, watch the video.
Do you already have a form? If so, you can use and modify that form. Then follow the steps right below the video.
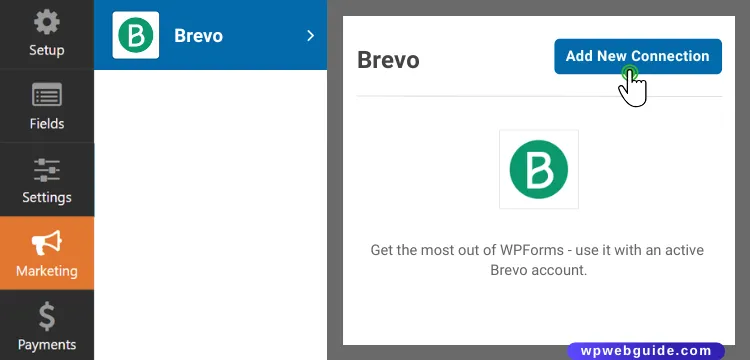
- 1. In the form-builder, you goto Marketing » Brevo.
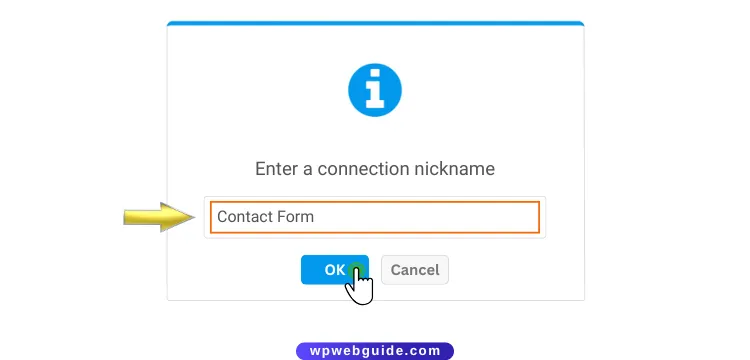
- 2. Hit the button Add New Connection on the tab for Brevo. As you click that button, a window opens where you can enter the nickname for the connection. Choose any nickname – it’s only for your reference. Push the button OK.
- 3. Do you use other Brevo accounts connected to WPForms? If so, you could pick one of the accounts you wish to use in the drop-down list for Select Account.
- 4. Choose action as your visitors complete and submit the form under Action To Perform. In our example, we pick Subscribe. That action will insert users straight into our Sendinblue contacts.
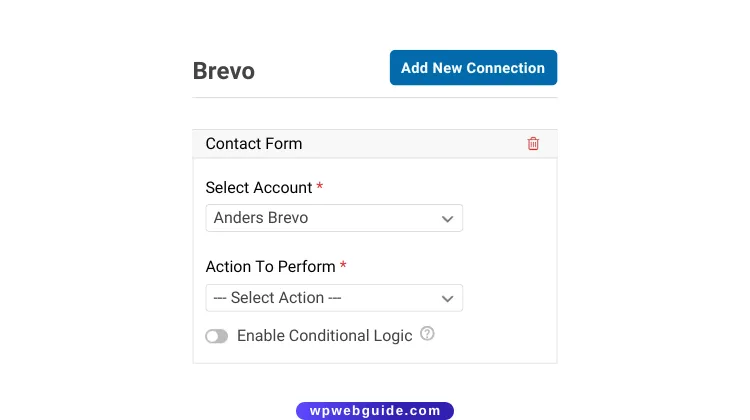

When you have selected the action to take place, there are more settings to configure. I describe those options below. Required fields will have an asterisk after.
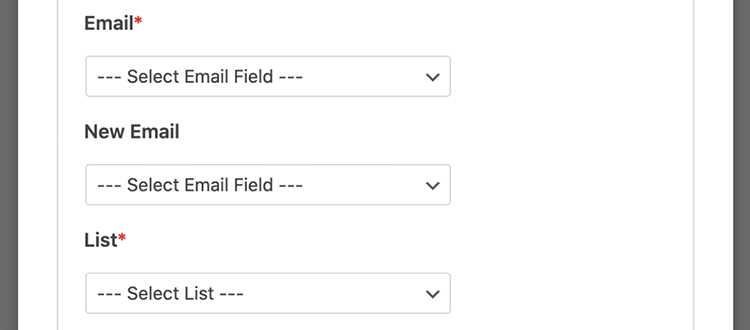
Email:* Choose the field in WPForms that holds the subscriber’s email address.
New Email: Choose the field in WPForms that holds the new email subscriber address. You will need it to update an existing Brevo contact. That’s why we let this field be empty in our case.
List:* Pick the list in Brevo where you want to add the subscriber.
You can also map all custom fields added to your Brevo account. The Custom Field Name section allows you to do this.
Connect Brevo to WPForms: Summary
Are you done configuring all your settings? Ensure you don’t forget to save the form. That’s all. Now you know how to connect Brevo to WPForms in 5 simple steps.
I hope you learned something from our tutorial.
Feel free to add your comments so we all can read and learn from them.
Let us know your thoughts below…
Tips
Welcome to read 10 Crazy Common WordPress Myths Debunked. You will learn to see the difference between what is WordPress facts or myths.
Share Your Comments & Feedback